Leave us your email address and be the first to receive a notification when Robin posts a new blog.
The reason why I am writing and presenting about this topic, is to show you that starting is not that difficult. And of course, it is fun to automate or build things, especially if the tasks are click intensive or error prone.
The previous parts of this blog series can be found here:
Part 1 Some basic introduction on API calls and Postman
Part 2 Creating a segment in NSX-T with PowerShell, thru API calls and using PowerCLI
Part 3 Creating a segment in NSX-T with Terraform
Part 4 Creating a segment in NSX-T with Ansible
So, by now you are familiar with the basics and in part 2 we have already setup the connection to NSX-T thru PowerCLI.
Creating a report
In part 2 of this blog series, we saw that:
$NewSegment = Get-NsxtPolicyService -Name com.vmware.nsx_policy.infra.segments
is used as an entry point to start with the creation of our segment. And with:
$NewSegment.list().results
we could already list all the segments currently in NSX-T. If we now use the array of results and loop thru it. We can retrieve the results per segment that we need for our report. In this blog we are creating a simple report that shows the ID, Name and VLAN's configured for each segment.
First, the array of results is added to a variable and an array for the results is created.
$AllSegments = $NewSegment.list().results
$result = @()
Next, we will loop thru the results using:
ForEach ($Segment in $AllSegments)
{
<here we need to filter the results per segment>
}
For each segment we will create a new Object or new line in our final report with:
$res = new-object -TypeName PSObject
For each piece of information about the segment we want in our report, we need to use Add-Member to add that information to the Object. Since we want to add ID, Name and VLANs we require the following three lines of code:
$res | Add-Member -MemberType NoteProperty -Name "SegmentID" -Value $Segment.id
$res | Add-Member -MemberType NoteProperty -Name "SegmentNaam" -Value
$Segment.display_name
$res | Add-Member -MemberType NoteProperty -Name "SegmentVLAN" -Value $Segment.vlan_ids
To explain the first line, it adds the value of $Segment.id, thus the id field for the segment we are currently processing and adds it to the Name SegmentID. SegmentID will be one of the columns in our report, as I will show later. The information of each segment is then added to the result using:
$result += $res
The complete code that returns the result looks like:
$NewSegment = Get-NsxtPolicyService -Name com.vmware.nsx_policy.infra.segments
$AllSegments = $NewSegment.list().results
$result = @()
ForEach ($Segment in $AllSegments)
{
$res = new-object -TypeName PSObject
$res | Add-Member -MemberType NoteProperty -Name "SegmentID" -Value Segment.id
$res | Add-Member -MemberType NoteProperty -Name "SegmentName" -Value Segment.display_name
$res | Add-Member -MemberType NoteProperty -Name "SegmentVLAN" -Value Segment.vlan_ids
$result += $res
}
$result
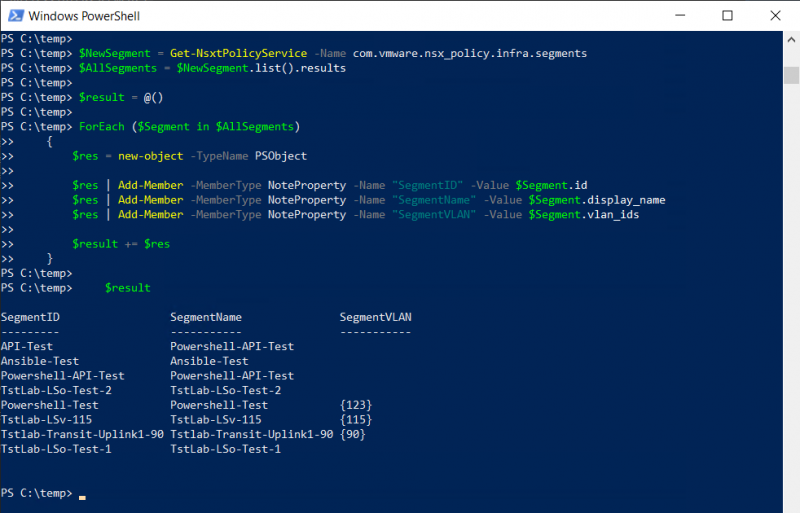
And if you run this code with an active PowerCLI connection to an NSX-T environment. You should get something like this:

Now that we have the information we require, the next step is to make it presentable.
Converting to HTML
To convert the information we created to HTML, we simply use ConvertTo-html available in PowerShell. Although the list shown above would probably be already readable in HTML code. If you want to have a daily or weekly report, you can publish it on a website. It would be nice to have some additional content and some styling or formatting.
Using -PreContent or -PostConect in combination with ConvertTo-html we can add additional information before or after the information we want to display. Like:
$PostContent = "<p id='CreationDate'> Creation Date: $(Get-Date)</p>"
$PreContent = "<p id='CreationDate'> This export has been created on: $(Get-Date)</p>"
For the styling or formatting we can use a header, like the example I found on the internet myself and modified it a bit.
$Header2 = @"
<style>
table {font-size: 12px; border: 0px; font-family: Arial, Helvetica, sans-serif;}
td {padding: 4px; margin: 0px; border: 0;}
th {background: #395870; background: linear-gradient(#49708f, #293f50); color: #fff; font-size:
11px; text-transform: uppercase; padding: 10px 15px; vertical-align: middle;}
tbody tr:nth-child(even) {background: #f0f0f2;}
#CreationDate {font-family: Arial, Helvetica, sans-serif; color: #ff3300; font-size: 12px;}
.NoTag {color: #ff0000;}
</style>
"@
Now we can convert our results to HTML using:
$result | ConvertTo-html -Head $Header2 -PreContent $PreContent -Title 'Export-Segments' |out-file -FilePath 'c:\temp\Report.html'

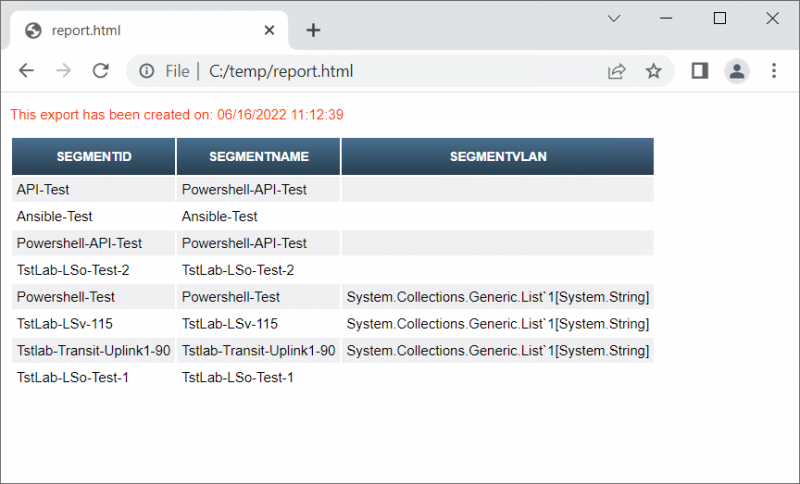
As you can see the HTML file already looks a lot more presentable. Of course there are still some things to improve, like the VLANs of the segments that are in an array. That is why they show up as system.collection… but at least you can use these steps to get started. My colleague Robert Cranendonk also created a blog to list load balancers in a CSV file or on a Confluence page. That might also be interesting to you if you want to use API calls instead of PowerCLI.
Hopefully, you have enjoyed reading this blog, as this is the final part for now. This series covers the items I talked about in my VMUG NL 2022 session. If you have any questions or would like to see some more, please leave your request at the bottom.
Questions, Remarks & Comments
If you have any questions and need more clarification, we are more than happy to dig deeper. Any comments are also appreciated. You can either post it online or send it directly to the author, it’s your choice.


 LinkedIn
 Twitter