


Leave us your email address and be the first to receive a notification when Robin posts a new blog.
The reason why I am writing and presenting about this topic, is to show you that starting is not that difficult. And of course, it is fun to automate or build things, especially if the tasks are click intensive or error prone.
The previous parts of this blog series can be found here:
Part 1 Some basic introduction on API calls and Postman
Part 2 Creating a segment in NSX-T with PowerShell, thru API calls and using PowerCLI
So, before we dive into the automating NSX with Terraform. What do we need to know before we get started? Remember this is the getting started series.
Terraform
Terraform is an infrastructure as code tool created by HashiCorp. On their website they have a great introduction available about Terraform. But as I did on the VMUG NL, I will give a small introduction.
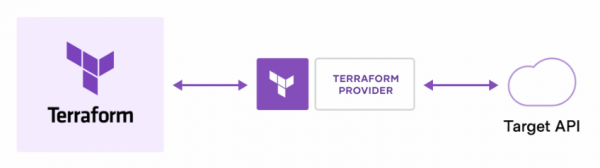
Terraform is an infrastructure as code tool that lets you programmatically declare what you want your infrastructure to look like. It then sets out and configures that infrastructure. Terraform talks to the API of the infrastructure thru providers. These providers can be found in the Terraform registry. And of course, there is also an NSX-T provider.
With Terraform you declare your NSX-T environment in a Terraform configuration file and with the provider Terraform can check or plan the changes that are needed to perform on the environment. Once the changes or updates are known, they can be applied to the NSX-T environment or to a complete infrastructure if there is a provider for it.
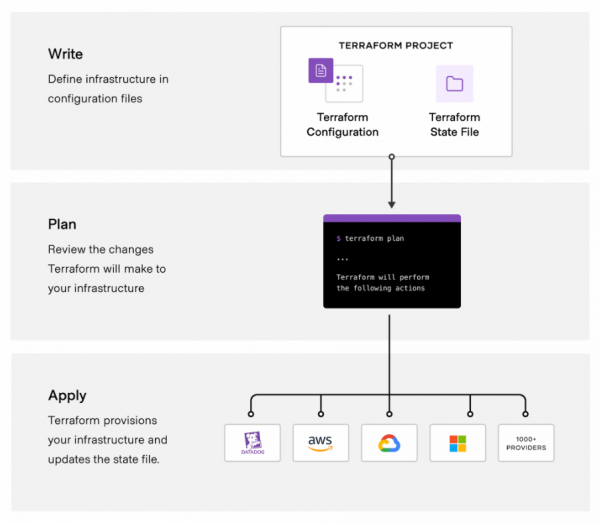
For NSX-T you can declare resources and data sources in the Terraform config file. A data source is something that is already present in NSX-T and a resource is something you want to create or to remain present with a specific configuration. Besides to the config file Terraform keeps track of the environment in the state file.
Getting started
The first step is to download Terraform. In my case, I have installed it on the same Ubuntu server as I am using for my Ansible installation. But Terraform is also available for Windows and macOS.
On my Ubuntu server I used the following commands as described on the download page:
curl -fsSL https://apt.releases.hashicorp.com/gpg | sudo apt-key add -
sudo apt-add-repository "deb [arch=amd64] https://apt.releases.hashicorp.com $(lsb_release -cs) main"
sudo apt-get update && sudo apt-get install terraform
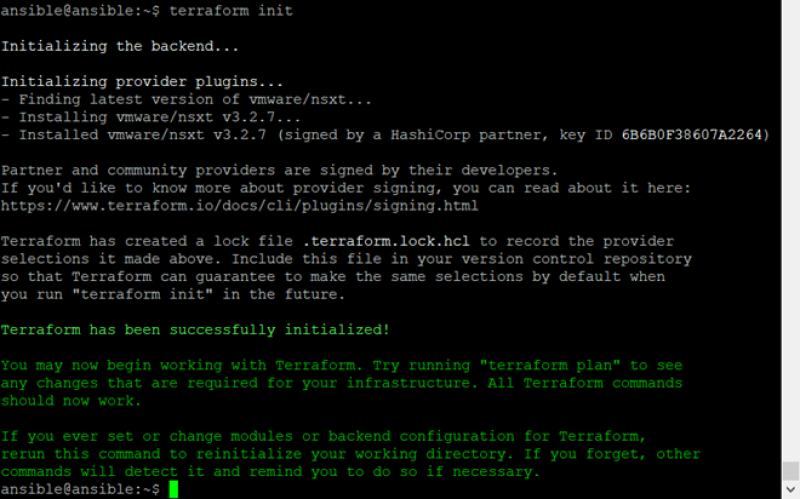
After Terraform has been installed, it needs to be initialized in a directory. So, on my Ansible server I made a directory and added the NSX-T provider to my config file:
terraform {
required_providers {
nsxt = {
source = "vmware/nsxt"
}
}
}
and ran terraform init.
The next step is to create a config file that specifies the resources we want to create. Like the other posts in this series. We will be creating a segment to show the basic functionality of Terraform. In the documentation on the Terraform provider for NSX-T there is an example on how to create a segment and on how to connect to NSX-T with credentials. For the connection, the example is:
provider "nsxt" {
host = "192.168.110.41"
username = "admin"
password = "default"
allow_unverified_ssl = true
max_retries = 2
}
And for the segment, the example is:
resource "nsxt_policy_segment" "segment1" {
display_name = "segment1"
description = "Terraform provisioned Segment"
connectivity_path = nsxt_policy_tier1_gateway.mygateway.path
transport_zone_path = data.nsxt_policy_transport_zone.overlay_tz.path
subnet {
cidr = "12.12.2.1/24"
dhcp_ranges = ["12.12.2.100-12.12.2.160"]
dhcp_v4_config {
server_address = "12.12.2.2/24"
lease_time = 36000
dhcp_option_121 {
network = "6.6.6.0/24"
next_hop = "1.1.1.21"
}
dhcp_generic_option {
code = "119"
values = ["abc"]
}
}
}
security_profile {
spoofguard_profile_path = data.nsxt_policy_spoofguard_profile.myprofile.path
security_profile_path = data.nsxt_policy_segment_security_profile.myprofile.path
}
}
Now we do not need all configuration for the segment shown in the example. So, I combined them and made a single nsxt.tf file in my Terraform directory.
terraform {
required_providers {
nsxt = {
source = "vmware/nsxt"
}
}
}
provider "nsxt" {
host = "192.168.136.20"
username = "admin"
password = "password"
allow_unverified_ssl = true
max_retries = 2
}
data "nsxt_policy_transport_zone" "tstlab_overlay_tz" {
display_name = "tstlab-overlay-tz"
}
resource "nsxt_policy_segment" "web" {
display_name = "web-tier"
description = "Terraform provisioned Web Segment"
transport_zone_path = data.nsxt_policy_transport_zone.tstlab_overlay_tz.path
subnet {
cidr = "12.12.1.1/24"
}
}
As, you can see we start with declaring the Terraform provider. Next are the configuration items to connect to NSX-T. Followed by a data source for the transport zone, which is already present. And finally a resource for the segment we want to create.
With this config file we can run Terraform plan to check if the config file is valid and to check what needs to be changed. If the configuration file is valid or if you are confident, you can run Terraform Apply.
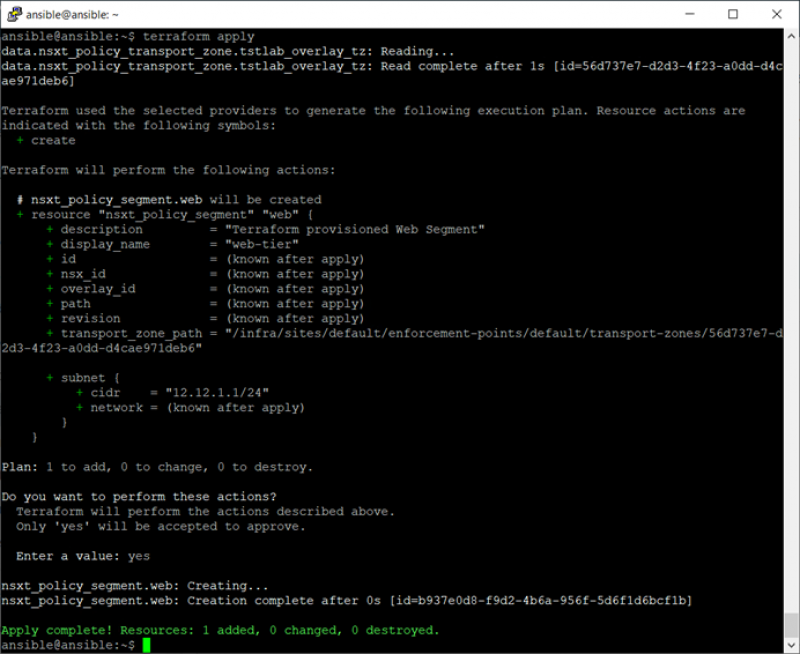
When you run Terraform apply a few things happen. A connection is made thru the provider and the current state file is refreshed. Terraform then generates an execution plan for the required configuration changes and displays them. This is where Terraform Plan stops, but for Terraform apply you can enter Yes or No if you would like the changes to be made to the environment.
Basically, that is all there is to it, if you want to create a segment in NSX-T. And again, I can show you a screenshot of the segment I have created, but I think it is more fun and educational to try this yourself.
State file
About 2 or 3 years back I have worked with Terraform for deploying a customer infrastructure into NSX-T. We used Terraform to deploy segments, security and load balancers into existing edges. Back then Terraform was talking to the manager part of NSX-T, since the policy part was just introduced in NSX-T 2.4. Back then working with Terraform was as easy as described above, but there was one thing that I absolutely did not like about Terraform, the state file.
Because Terraform kept track of every thing it created in NSX-T inside the state file. So, if someone modified the configuration in NSX-T instead of in Terrafom, the state file was out of sync and an error was thrown when you ran Terraform plan or apply. Of course, there were ways of modifying the state file with terraform state rm, but to me it greatly undermined the simplicity of working with Terraform.
Since then, a lot has improved. Terraform now talks to the policy part of NSX-T and refreshes the state file before running the plan or apply. So, if you delete the segment, you have just created in the NSX-T GUI and run Terraform apply again. You will see that the segment will be created again. This feature greatly improves the usability of the product.
Variables
As a last topic for this basic overview, variables are also something you need to have a look at. As you can see in the code shown above the password for the connection to NSX-T is stored in the config file. And there may be other configuration variables you do not want to have in your configuration file, simply because they differ between environments.
To use variables in the Terraform config file we need to declare the variable like the data sources. As you can see in the example below a variable nsxt_password is declared and later used as var.nsxt_password.
variable "nsxt_password" { description = "Password for NSX-T"
type = string
sensitive = true
}
provider "nsxt" {
host = "192.168.136.20"
username = "admin"
password = var.nsxt_password
allow_unverified_ssl = true
max_retries = 2
}
The variable itself is stored in another file, that I called nsxt.tfvars, which looks like this:
nsxt_password = "password"
As you can see it is simply the name of the variable with the value. The vars file needs to be called when running the plan or apply.
Terraform plan -var-file=”nsxt.tfvars”
Still the password is in clear text here, but at least the file does not have to be in the code repository. And of course, there are other methods, but that is beyond this blog post.
That is it for now. In the next part of this series, I will explain some of the basics about Ansible and how to use it against NSX-T. Hopefully, you have enjoyed reading this blog. If you have any questions or would like to see some more, please leave them at the bottom.
 LinkedIn
 Twitter
Questions, Remarks & Comments
If you have any questions and need more clarification, we are more than happy to dig deeper. Any comments are also appreciated. You can either post it online or send it directly to the author, it’s your choice.