


Leave us your email address and be the first to receive a notification when Robin posts a new blog.
Where do you start if you want to automate something? Some basic knowledge of how the product works is a must. If you cannot configure or build it manually there is no use in trying to automate it. Now for NSX, I can say that I have the knowledge to design, implement and troubleshoot it. But as I said in my VMUG NL presentation I am not an automation expert.

The reason why I am writing and presenting about this is to show that it is not that difficult to start with it. And of course, it is fun to automate or build things, especially if the tasks are click intensive or error prone. This blog series is split into 5 seperate parts, but let's start at the beginning. What do we need to know before we get started?
API call
API stands for Application Programming Interface, so basically it is an interface to program or communicate with an application. In this blog I am not going to explain the specific details, but just enough to get you started. You can look up the specifications and details on the internet.
Usually, I compare an API call with an order to a waiter in a restaurant. As a customer you can tell your order to the waiter. The waiter communicates the order to the kitchen. The kitchen processes the order and returns the product. The waiter then returns the product to you. That is, if all goes well. If there are any issues you may receive a message saying that something is not available for example.
An API call works in the same way. We give an assignment or request using the API call to the application. The application processes the request and returns a response. The response can be a return code, a message or both.
When giving the order to the waiter you need to specify if it is a request for information or if he needs to do something. With the API call it is the same. You can use a GET command to retrieve information and PUT, POST or PATCH commands to create, modify or perform some other action.
The response codes are like the HTTP status codes:
- 1xx: Informational – Communicates transfer protocol-level information.
- 2xx: Success – Indicates that the client’s request was accepted successfully.
- 3xx: Redirection – Indicates that the client must take some additional action to complete their request.
- 4xx: Client Error – This category of error status codes points the finger at clients.
- 5xx: Server Error – The server takes responsibility for these error status codes.
Mostly the response codes and required commands are documented with the API calls. For NSX they can be found here.
The returned message and the assignment (or body) are usually sent in the form of a JSON file.
JSON
JSON stands for JavaScript Object Notation. Again, I am not going to explain the detail but just the part to get you started. JSON is a standardized file format for data exchange. It is human readable and consists of data arranged in objects and arrays. Objects and arrays can have multiple values, but Objects are noted with curly braces {} and Arrays are noted with brackets [].
{
"firstName": "John",
"lastName": "Smith",
"phoneNumbers": [
{
"type": "home",
"number": "033 1234567"
},
{
"type": "office",
"number": "030 1234567"
}
]
}
In this example you see an Object that contains multiple values: first name and last name. But also, an Array of multiple objects for phone numbers. Each Object in the Array has multiple values.
Placing the order
Well now that we know that we can use an API call with a JSON body to automate against NSX. How do we get the messages across?
For this there are two tools that I use mostly, depending on the environment I am working in. If available my preferred choice is Postman, but Curl is also an option. Postman is a graphical tool to execute API calls towards an application. It is my first starting point to test if an API call or the JSON body is working.
Postman
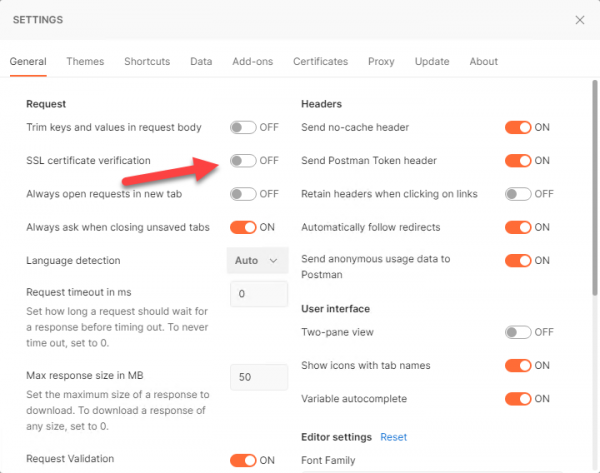
Once Postman is installed and started the first step is to make sure the certificates are not verified. At least, this needs to be done if you are using NSX-T with the default certificates, as we are using in our lab environment. This can be done on the Settings page.
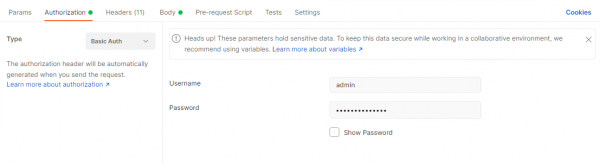
The next step is to make sure the API request can be authorized by NSX. Mostly I use Basic Authentication to test the API calls against NSX. There are some other methods, but maybe that is a topic for another blog post.
The authorization type and credentials can be entered at the Authorization tab directly under field for the API call.
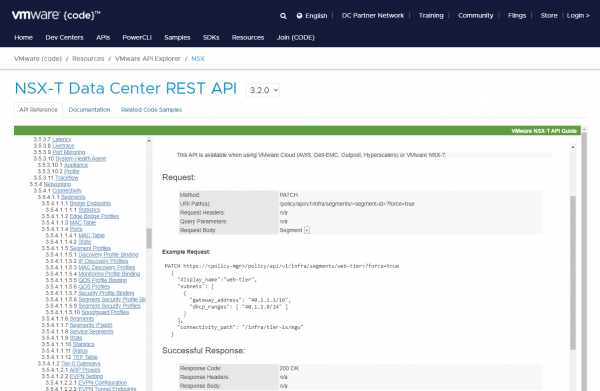
During the VMUG NL presentation I used creating or modifying a Segment in NSX as an example for every tool. To create or update a Segment the Patch command needs to be used. The API call for this is
https://<NSX Manager address>/policy/api/v1/infra/segment/<segment-id>
As mentioned before, a complete overview of the API calls in NSX can be found here. In the documentation some examples of the JSON body can also be found.
The example below has been taken almost identical from the NSX API documentation.
As an example, I copied the example request from the documentation and modified the display_name. The dhcp_ranges value was removed, including the comma at the end of the gateway_address to make the JSON file valid again. And the connectivity_path value was cleared since I do not have a Tier 1 called mgw in my lab. The JSON body then looks like this:
{
"display_name": "API-Test",
"subnets": [
{
"gateway_address": "40.1.1.1/16"
}
],
"connectivity_path": ""
}
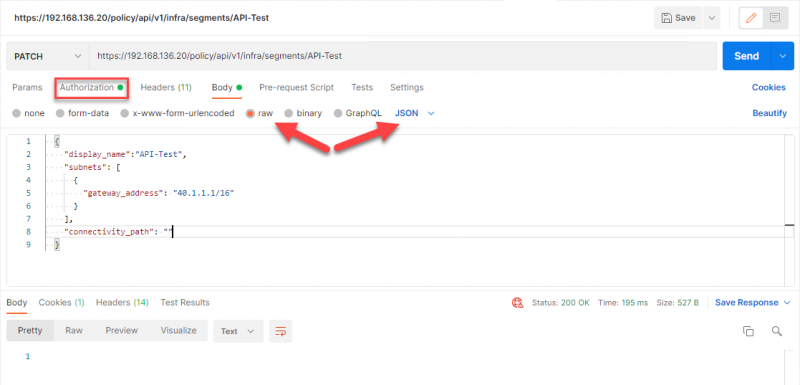
On the left of the Send button the API call can be entered. On the Authorization tab the user-id and password need to be entered. Since this is a PATCH API call a body with the task or assignment for NSX needs to be send. On the Body tab, raw and JSON are selected. The body needs to be entered in the field below.
When the Send button is pressed the call is processed by the NSX manager on IP-address 192.168.136.20 and a response is returned. In this case the response is 200 or OK, which indicates the segment has been created or updated accordingly.
Next step is to validate the segment has indeed been created as expected. This can be done thru the GUI but for this blog I will use CURL.
CURL
CURL is a is a command line tool that enables data transfer over various network protocols, including the API call over a HTTPs connection. It is most common on Linux but can also be installed and used on Windows. The command is almost the same as in Postman but in this case, we need to get information about a segment instead of creating one. So, we are using the same API call but with a GET command. The full command I am using in the example is:
curl -k -i --user admin -H "Accept: application/json" -X GET https://192.168.136.20/policy/api/v1/infra/segments/API-Test
Since I am not supplying a password, it is requested. The complete output of the command looks like this:
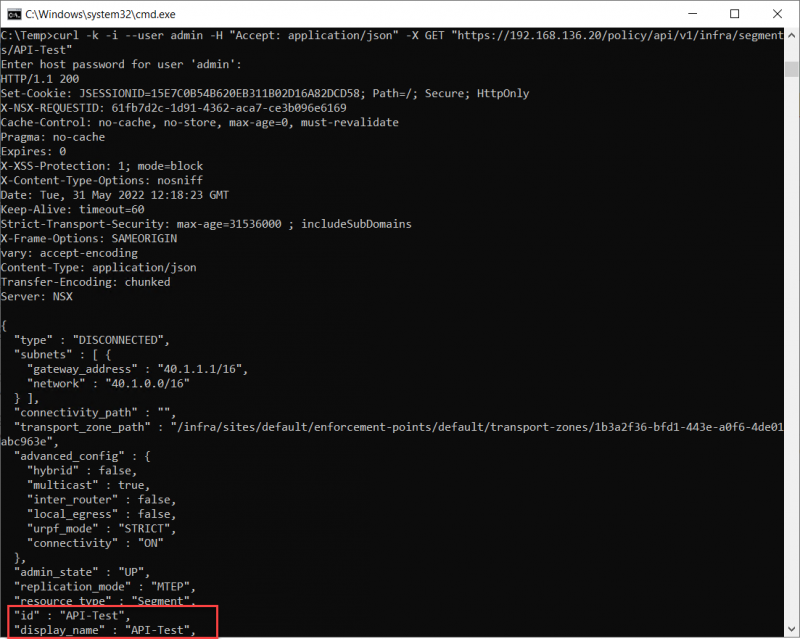
At the bottom you can see both ID and display_name are API-Test as requested in the Postman call. Although I prefer to use Postman, it can be handy to know how to use Curl and familiarize yourself with the command structure. It has saved me on many occasions where Curl was available on the OS and Postman first had to be downloaded and installed. Which is not always possible.
And with verifying the segment has indeed been created I want to end this first part of the blog series about ‘Getting started with automating NSX’. In the next parts I will touch on the basics of automating NSX with Powershell, Terraform and Ansible. Hopefully, you have enjoyed reading this blog. If you have any questions or remarks, please leave them at the bottom.
 LinkedIn
 Twitter
Questions, Remarks & Comments
If you have any questions and need more clarification, we are more than happy to dig deeper. Any comments are also appreciated. You can either post it online or send it directly to the author, it’s your choice.