


Leave us your email address and be the first to receive a notification when Robert posts a new blog.
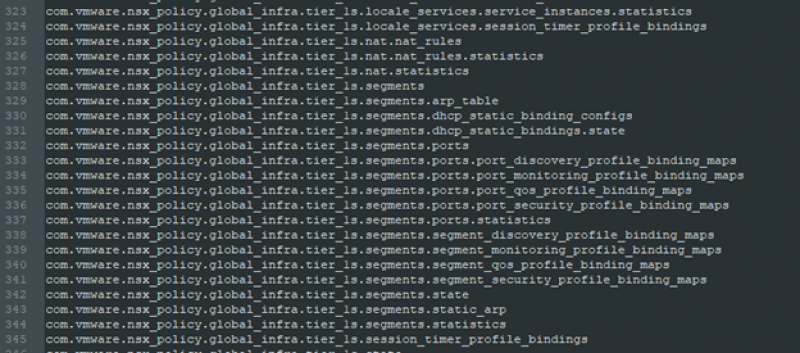
PowerShell is my go-to for any VMware-based scripting, and NSX-T is no exception. Normally I'd use PowerCLI or PowerNSX to get my scripts going. But although PowerCLI is great for vSphere scripting, I don't really like the PowerCLI implementation of NSX-T. The way you reference objects and components is through using the massive list of NSX-T 'services', which are not always as descriptive and obvious as they should. Nor could I find a good reference doc where they are explained.
The good thing is, the actual API documentation is great. If you want to dive in a bit deeper, my colleague Robin also wrote a blog about using PowerCLI with NSX-T. As always: do what works best for you, your mileage may vary.
So for me; down with PowerCLI, long live native PowerShell API!
This script was inspired by and adapted from a script by Sean O'Brienn.
Note: For brevity's sake I omitted quite some lines of code. Included in this post are just the functional bits, if you want to deploy this remember to add some try and catch blocks, validation and checks, and any (debug) output you would prefer.
Purpose
For a client we have created quite a few load balancers that handle their SSL offloading and traffic redirection. But in order to get an overview of each configuration you sometimes have to go 3 menus deep. Plus, we can't share that easily. The end goal of today's script is to get an overview of all the configs I want to see, and nothing else.
This project is comprised of 4 steps:
- How do I authenticate and use the NSX-T API without using any modules?
- How do I get all the information I need?
- How do I export it to a CSV/usable format?
- How do I upload it to Confluence?
Using the NSX-T API
The first objective of running any script is figuring out how to actually talk to the application. Each API endpoint has its own implementation, not to mention how your scripting language handles the return information. Starting with Postman and the NSX-T API documentation I figured out what using this API looked like. With this I continued on to PowerShell and started implementing it there.
The NSX-T API documentation uses curl for all its examples, and although PowerShell is able to use this, curl in PowerShell is actually just an alias of the Invoke-webrequest command. The translation isn't 100% either.
There are multiple ways we can log in to NSX-T using the API; we can either authenticate with each request, sending our credentials every time, we can create a session or use a certificate. I prefer not having to send my credentials more than I absolutely need to, so I chose the 2nd option; creating a session. This means creating and getting a cookie!
NSX-T API doesn't consume the secure credentials directly. So while this is a good way to store your credentials when actually deploying the script, we use them in plaintext to send them in a POST message in order to create our session.
To do this we'll use the PowerShell WebRequestSession object and Invoke-WebRequest command. The API command is POST <nsxManager>/api/session/create with the body containing our username and password. This results in a JSON response, in which we can find our cookie and the X-XSRF-TOKEN. Since we're using the WebRequestSession as our session handler, we don't need a separate cookie in the header, but the X-XSRF-TOKEN we will have to store for the subsequent API calls.
function createSession {
$script:session = New-Object Microsoft.PowerShell.Commands.WebRequestSession
$uri = $nsx_uri + "api/session/create"
$private:body = "j_username=$($nsxtUsername)&j_password=$($nsxtPassword)"
$response = Invoke-webrequest -contentType "application/x-www-form-urlencoded" -WebSession $session -uri $uri -Method 'POST' -Body $body -usebasicparsing
#Session cookie is stored in $session
#X-XSRF-TOKEN needs to be stored in headers for use in subsequent requests
$xsrftoken = $response.headers["X-XSRF-TOKEN"]
$script:headers.Add("X-XSRF-TOKEN", $xsrftoken)
}
And now we're authenticated! We'll use the $session variable for each of our API calls and passing the $headers with it.
To close the session at the end of the script use the following API call.
function killSession {
$uri = $nsx_uri + "api/session/destroy"
Invoke-webrequest -headers $headers -WebSession $session -uri $uri -Method 'POST'
}
Getting the information
A Load Balancer in NSX-T contains the following components which I want to get:
- Virtual Server name, IP, and incoming port
- Type of Virtual Server (SSL offloading or HTTP/HTTPS redirect)
- Back end VM pool, the forwarding port, and the service monitor that checks if the pool is alive
- If applicable; the SSL certificate
This turned into a 3-step approach because of the way the objects exist in NSX-T:
- Get the Virtual Server object and config, which gives us:
- Virtual Server ('load balancer') Name
- Virtual Server IP
- Incoming Port
- Type of Load Balancer
- SSL Certificate
- back end Pool ID
- Translate the back end Pool ID to an object, which gives us:
- Pool name
- Service monitor
- VM group ID
- Then we have to translate the VM Group ID to a list of VMs:
- The VM names
The somewhat annoying part of NSX-T (and also why it is pretty robust), is that it uses UUIDs for a lot of things, rather than relying on names. Which is great if you want to rename stuff, but it also means you have to translate them to be human-readable. Which means multiple steps are involved.
Step 1 - Getting the Virtual Server object and config
First is getting the 'main' object from which we will gather the rest. The API command is GET <nsx manager>/policy/api/v1/infra/lb-virtual-servers which we'll store in $loadbalancer_uri . Calling it together with our session cookie and the headers we've created above:
$response = Invoke-restmethod -headers $headers -WebSession $session -uri $loadbalancer_uri -Method 'GET'
Now we have a $response filled with a bunch of information, which we'll have to pull apart. I had to nest some functions to get all the information I needed - in order to fill $vip_pool I'm calling the next function to get the Load Balancer (or back end) pool, which in turn calls the function to get the actual VMs.
Below you can see the loop which iterates through the response. It then uses the results to populate $lb_row which then gets fed into $lb_array , which is our final product. By creating this with the $script: prefix we can then use this object anywhere in the script, without first declaring it globally.
$script:lb_array = @()
foreach ($VIP in $response.results) {
#results can be addressed directly because they're parsed by invoke-restmethod, but the value is like /infra/domain/default/<string_we_actually_need>, so split each string and get the juicy bits
$VIP_cert = ($VIP.client_ssl_profile_binding.default_certificate_path -split "/")[3]
$VIP_profile = ($VIP.application_profile_path -split "/")[3]
$vip_pool_id = ($VIP.pool_path -split "/")[3]
#create CSV row
$lb_row = " " | Select-Object "VIPname", "IP", "IncomingPort", "BackendPort", "SSLCert", "BackendVMs", "BackendPool", "ActiveMonitor"
$lb_row.VIPname = $VIP.display_name
$lb_row.IP = $VIP.ip_address
$lb_row.IncomingPort = [string]$VIP.ports
#if it is a redirect to HTTPS VIP then we don't need other information
if ($VIP_profile -eq "redirect-http-to-https") {
$lb_row.BackendPool = $VIP_profile
$lb_row.BackendVMs = " "
$lb_row.ActiveMonitor = " "
$lb_row.BackendPort = " "
}
#if it's not a redirect VIP then get the rest of the information
elseif ($vip_pool_id) {
#the pool as written in the VIP information we have is a UUID, so the function below translated the UUID to useful information
$vip_pool = getLBPool($vip_pool_id)
$lb_row.BackendPool = $vip_pool.name
$lb_row.BackendVMs = [string]$vip_pool.VMs
$lb_row.ActiveMonitor = $vip_pool.monitor
$lb_row.BackendPort = [string]$VIP.default_pool_member_ports
#does the VIP have a certificate associated with it?
if ($VIP_cert) {
$lb_row.SSLCert = $VIP_cert
}
else {
$lb_row.SSLCert = " "
}
}
$script:lb_array += $lb_row
}
Step 2 - Translate the back end Pool ID to pool object
The function above uses $pool_group_id passed to the function getLBPool in order to do exactly that; get the pool object. From this we'll extract the pool's name, the active monitor (which checks if the back end servers are receptive for traffic), and the ID of the attached group of VMs. Which then calls the next function named getGroupVMs to translate that ID.
The API command is GET <nsx manager>/policy/api/v1/infra/lb-pools/<poolID> , again passing the $session and $header along with the command.
function getLBPool($poolID) {
$uri = $nsx_uri + "policy/api/v1/infra/lb-pools/" + $poolID
$response = Invoke-restmethod -headers $headers -WebSession $session -uri $uri -Method 'GET'
$pool_name = $response.display_name
#results can be addressed directly because they're parsed by invoke-restmethod, but the value is like /infra/domain/default/<string_we_actually_need>, split each line on the / and get the relevant part
$pool_monitor = ($response.active_monitor_paths -split "/")[3]
$pool_group_id = ($response.member_group.group_path -split "/")[5]
if ($pool_group_id) {
#the group as written in the VIP information we have is a UUID, so the function below translates the UUID to useful information
$groupVMs = getGroupVMs($pool_group_id)
}
#store all the results in a PSobject and return that
$pool = [PSCustomObject]@{
Name = $pool_name
Monitor = $pool_monitor
VMs = $groupVMs
}
return $pool
}
The results get passed back to the calling function, so we can input the results in the $lb_row .
Step 3 - Translate the VM Group ID to Virtual Machine names
Once again we call a function within a function to translate an ID to something human readable. This time we want to collect a list of our back end server VMs.
The API command is GET <nsx manager>/policy/api/v1/infra/domains/<domain ID>/groups/<groupID>/members/virtual-machines . Once again with $headers and $session. The Domain ID is default.
function getGroupVMs($groupID) {
$uri = $nsx_uri + "policy/api/v1/infra/domains/default/groups/" + $groupID + "/members/virtual-machines"
$response = Invoke-restmethod -headers $headers -WebSession $session -uri $uri -Method 'GET'
$VM_array = @()
#there may be multiple VMs in one group, get them all and return as array
foreach ($VM in $response.results) {
$VM_array += $VM.display_name
}
return $VM_array
}
The result is one or more VMs which we are passing back up along the trail!
Putting it together and CSV export
Through our daisy-chain of functions we now have a filled $lb_array object which we can output. PowerShell is really easy to use when it comes to exporting to CSV, so this is an easy task.
We simply have to define a path (I'll let you use your imagination) and then call Export-CSV and that's it.
$lb_array | Export-Csv -Path $csvOutputPath
That's it for the CSV. Use some try and catch mechanisms here and there, and make sure your path is accessible.
We can open up the output in Excel (or Notepad) and have a look at:

I don't really call my VMs 'VM01' and 'VM02'
Awesome! That's 3 out of the 4 steps of this project done!
Writing to Confluence Wiki
For a lot of documentation we rely on Confluence, including what we share with our clients. This entire project was done so that our client can easily see what they have deployed for Load Balancers without having to click through NSX-T.
So, how do we get the information we just pulled from NSX-T into the Wiki?
Unfortunately I had to admit defeat on using native API-only commands and rely on an external module. I wanted to do this project completely native, but the Confluence format and API was a bit more than I could chew.
So in comes ConfluencePS!
Logging in (again)
First I had to figure out how to authenticate to this API.
This is done through an API token I created for our automation user/service account. From this we create a secure credential object which is then used by the ConfluencePS module to create a session.
#convert the plain-text API token to a secure string
$secureToken = ConvertTo-SecureString -String $confluenceApitoken -AsPlainText -Force
#create a credential object with the secure API token and username
$cred = new-object -typename System.Management.Automation.PSCredential -argumentlist $confluenceUsername, $secureToken
#set the default URL and credentials to be used by future API calls with ConfluencePS
Set-ConfluenceInfo -BaseURI $ConfluenceURL -credential $cred
Creating the Confluence content
With our authentication out of the way we can prepare our Confluence page body. The storage format for Confluence tables isn't just plain HTML, there's a little magic involved. This is why ConfluencePS was absolutely necessary for me here, because otherwise this would be a nightmare.
We import our CSV and convert it to the Confluence format.
$table = $importedCsv | ConvertTo-ConfluenceTable
That was easy!
I did have to do some small adjustments like trimming unnecessary spaces here and there, and as a bonus I added a banner at the top of the page to let readers know that this is an automatically generated page.
In order to upload the new table we first get the page, then replace the body of the page with our new table. Calling Set-ConfluencePage then upload it to the Wiki, using the credentials and URL we defined above.
$page = Get-ConfluencePage -SpaceKey $confluenceSpace -title $confluencePageTitle
$page.body = $table
$page | Set-ConfluencePage
Which then looks a little something like this:
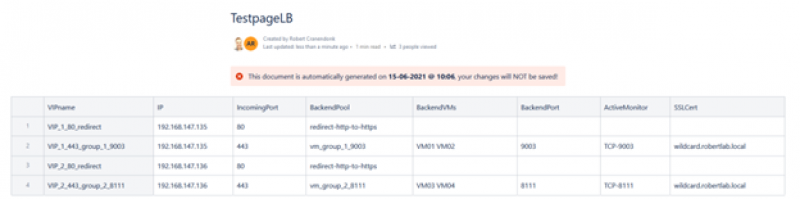
And that's it! Took a little digging but the end result is quite nice.
Next steps are figuring out how to deploy this, so that it runs automatically and unattended. Normally I'd simply deploy a Windows Server and put the script on there, kicked off by a task schedule. But this is the future, so maybe I can do something with Ansible. More on that later!
Shout out to my colleague Davy van de Laar for writing a similar post, but using the PowerCLI implementation! Check it out here.
 LinkedIn
 Twitter
Questions, Remarks & Comments
If you have any questions and need more clarification, we are more than happy to dig deeper. Any comments are also appreciated. You can either post it online or send it directly to the author, it’s your choice.