


Leave us your email address and be the first to receive a notification when Robert posts a new blog.
The way I’m proposing to use the NSX-T Firewall isn’t necessarily the best or recommended way, it’s just what I’ve been taught and what works. Remember to read the VMware Security Reference Design Guide for more information. As always; your mileage may vary. Don’t take my word for gospel, figure out what works for you and your environment.
King of your castle
One of the analogies you’ve probably heard about firewalls is the one of the castle. It goes like this: consider your environment a castle. Your perimeter firewall, the one facing the big bad internet, is the wall around your castle (called a bailey). Designed to keep the barbarians, or hackers, out of your castle’s grounds. The drawbridge is like the ports you’ve opened to allow good traffic inside.
But once the evil invaders have breached the walls, there’s nothing preventing them going from the throne room to the treasury, stopping at the larder in the meantime, wreaking havoc everywhere. Once you’re in, you’re in.
To prevent this free movement within your castle’s walls you can install more walls and checkpoints, multiple layers of protection depending on where you keep your crown jewels.
Macrosegmentation
Moving away from the castle analogy and back into the datacenter, these layers can take the form of VLANs with added protection, segmenting the network in broad strokes of common applications. For example, separating your VDI environment from your management interfaces.
I refer to this as macrosegmentation, and this is usually what you see in most networks. Or what you’d hope to see, as this is a minimal first step of securing your environment.
Just having multiple VLANs isn’t security though. Think of this as putting up the walls within your house, it separates the functions from each other. Adding a firewall between these VLANs is a security measure though. But again, within each VLAN you usually have free movement.
NSX firewall
Adding more protection, say for example to each of your endpoints/VMs, you enter the realm of microsegmentation. Instead of bundling on VLAN or segments, you give each and every VM its own firewall. With standard physical firewalls this is simply not feasible, either because of management, cost, or technical limitations.
An option would be the in-guest OS firewall, but this brings other challenges. Management has become a lot better, but the fact remains that in-guest OS firewalls are located within the attack domain – in other words, when the VM is compromised, one of the first steps is to disable this firewall.
NSX (V and T) has the firewall located outside the guest OS, located at the vNIC level. Meaning that this is not reachable (and configurable) from within the VM itself. This is what makes NSX so unique. It operates at the hypervisor level (technically the DFW uses a slot between vNIC and vSwitch) so it can enforce policies before it even reaches the physical network.
The distributed firewall is configured through the NSX-T Manager, which then pushes the config to each hypervisor where the rules are enforced. This means no hairpinning, or rerouting traffic to an external piece of software. It all happens within the host, even before it enters the physical network.
Building a 3-tier app
Before we can start configuring a firewall, we need something to protect. Since this is a lab I don’t have any real workloads on there, and I wanted to show you something meaningful while still being relatively simple. To simulate some traffic I’ve used this set of blogs created by Doug Bear to create a simple 3-tier application (web, app, db) which we can then use in our examples.
I opted not to use SSL since it doesn’t really matter here anyway (and also because I couldn’t get it to work). The ports are examples anyway. So for servers we have:
| VM | IP | Purpose | Listening port |
| web-01a | 192.168.148.135 | frontend/web server | 80 |
| app-01a | 192.168.148.165 | application layer – connects web to DB | 8443 |
| db-01a | 192.168.148.200 | database with content | 3306 |
I’ve connected each VM to its own NSX-T /27 segment.
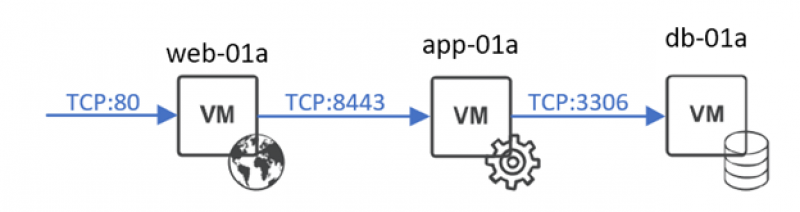
For simplicity’s sake we’ll call our app “3-tier”, consisting of these 3 VMs.
NSX-T Distributed Firewalling
The NSX-T Firewall is split into 5 different categories:
- Ethernet
- Emergency
- Infrastructure
- Environment
- Application

Rules in these categories are handled in order. Any traffic that hits a rule in Emergency, will not also hit a rule in Application, for example. These category names are also merely suggestions (except for Ethernet, that is specifically Layer 2 rules). You don’t have to put Environment rules in the Environment category, although it does help to keep your rulebase clear.
The basis of microsegmentation is about allow-listing. You have a default any-any deny rule at the end, which denies any traffic unless explicitly allowed.
Layers
A good way to build a flexible, reusable, and manageable firewall rulebase is to use layers. This is also why you have the different categories in NSX-T. Most rulebases revolve around the latter 3: Infrastructure, Environment, and Application.
- Infrastructure is the broadest layer used for separating the ‘big islands’ of your SDDC (like a tenant, or sub-organization), or for rules that apply to the infrastructure as a whole. Things like DNS, NTP, ICMP. Things like shared services.
- Environment can be used for separation along Production, Development, Testing, QA, Staging etc.
- Application is the big chunk of your infrastructure, this will also be the largest part of your rulebase. This is where you configure the rules allowing an application to talk to others through specific ports.
To distinguish your workloads for each of these layers, we’re using tags and groups. We’ll build our rulebase around VM groups, which are in turn created through the use of tags. In the Inventory tab of NSX-T we can start creating them.
Tagging and grouping
NSX-T uses tags within a (user-defined) scope, much like a key-value list. Note that NSX-T/security tags are not the same as vCenter tags.
| Scope | Value | Applied to |
| Infrastructure | n/a (we only have one infra) | n/a |
| Environment | Production | All three |
| Environment | Development | None |
| Tier | Web | web-01a |
| Tier | App | app-01a |
| Tier | Db | db-01a |
| Application | 3-tier | All three |
Using these tags we can create groups which we can then use to build our rules. We’ll create groups for each of the above tags so that we can refer to them accordingly.
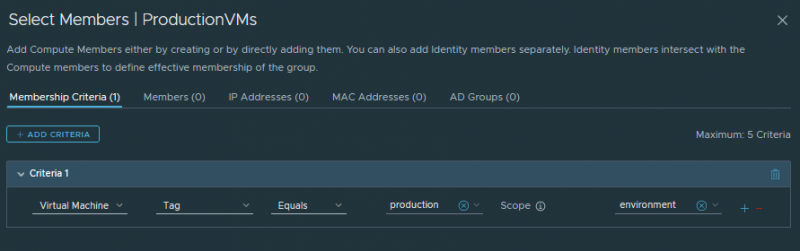
Any VM we create from this point forward and we attach these tags to (for example through vRA or any other automation platform), will become part of these groups. And since we’re firewalling around groups, the rules will also automatically apply to these new VMs as well! Neat!
Building rules
It’s important to remember that in the end we’ll configure a default any-any deny rule. So we don’t have to create any deny rules, only allow rules.
Since I only have one infrastructure I’m skipping that category for now, and jumping ahead to Environment.
Environment category
In a normal SDDC you’d have multiple environments like prod/dev/test. Preferably, these environments shouldn’t be able to talk to each other. Since we’re denying everything by default we don’t even have to build additional rules for that. But in a development environment we want our developers to have total freedom to try out all their new applications and versions. So we dó have to allow free movement between VMs with the development tag.
Although not part of my 3-tier app, still wanted to show you what it would look like as an example.

In the example above we’ve created a policy called Development in the Environment category, creating a rule with source ‘DevelopmentVMs’ and destination ‘DevelopmentVMs’. We’re allowing the VMs with the ‘development’ tag to communicate with all other VMs with this tag, them being part of these groups. And because this is in the Environment category, this rule will be hit before moving to the the Application category, preventing any deny-rules from stopping our developers from doing their work.
Application category
Firewalling with NSX-T revolves around groups of VMs that together form one application. Hence our 3-tier app example. Although these are 3 separate VMs, they all work together to provide a single application to our end users. This grouping is very important to work out before you even start to build a rulebase, more on that later.
Since our VMs are all one application, we can create a policy for this, and call it “3-tier-app”.
The “Applied To” field
One of the really powerful settings in NSX is the “Applied To” field. This allows you to only apply certain rules to certain groups of VMs, instead of to your entire NSX-T Fabric. This prevents accidental configuration mishaps, but also really slims down the total overhead of your rulebase. Especially when you are microsegmenting a large environment, the rulebase can get quite large. And the larger it gets, the longer it takes to process.
By leveraging the Applied To field, only the rules that are relevant to the VM are applied to it. This reduces the overhead on the ESXi host where the rules are enforced, because not every rule for every VM is loaded into memory. That means if certain rules apply to VMs that aren’t located on an ESXi host, the rules aren’t necessary and aren’t loaded to this particular host. If the VM then migrates to this host they will be loaded.
So for our app we can edit the Applied To field to only include our 3-tier-app VMs. We can define this on the policy level, or on each individual rule.
Creating rules
We need to allow our VMs to talk to each other via the ports we have configured in our applications. That means we need to allow 3 streams of traffic, and deny everything else.
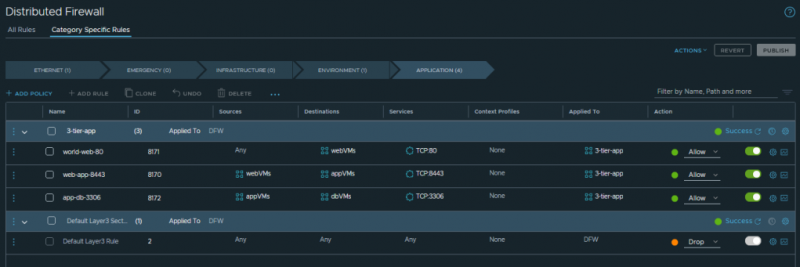
In our 3-tier-app policy we define the following rules:

Source and Destination fields are pretty self-explanatory. That’s the to and from for your traffic.
- The services field is in this case the port we want to allow. I’ve named them TCP:<PORT> for clarity, but you could use HTTP for port 80, and MySQL for 3306.
- Context Profiles is the field you’d use for Layer-7 firewalling. Services is for ports, but with L7 firewalling you could also detect whether or not the traffic using that port is the traffic you want to allow. No more mis- and abusing ports!
- The Applied To field here is to override the one we’ve configured on the policy. I prefer setting them here rather than on the policy level since the UI is just not very clear when it is set on the policy.
- And finally the Action, which tells the firewall to allow, drop, or reject the traffic. When using Reject, the sender of the traffic gets a message that it is rejected. With Drop, the traffic is simply ignored, no message is sent back.
There are some more settings behind the little cog for each rule, such as logging which helps in debugging.
Closing the gates
With our rules in place we can be assured that our 3-tier-app is able to function when everything else is denied. By changing the final rule in our rulebase to Drop all the traffic not approved by any rules above it we have secured our environment.
Be careful when changing the default rule to drop because you can lock yourself out! Use the exclusion list (located behind the ‘Actions’ dropdown) to prevent management VMs from being locked.
Our total rulebase then looks like this:
In the below GIF you can see me pinging the web-01a VM, which is denied since we haven’t explicitly allowed ICMP. Then navigating to the webpage of web-01a we can see that the webpage is properly loaded and the database information is present as well. Success!

Closing thoughts
If only reality was as simple as our 3-tier-app example. Most environments are immensly complex and have grown over the course of many years, and there probably isn’t an administrator anymore who knows all the different traffic flows.
So the first step to creating a microsegmentation plan is discovering your application model. This can be done through looking at documents, talking to application owners and such. Or you could use a netflow collector like vRealize Network Insight. vRNI builds an application model for you based on the flows it detects on your VDS. From this you can start creating your model, rulebase, etc.
When you have your model, go step-by-step by securing the different applications (or groups of VMs), using the final rule in your rulebase for logging. Once this final rule doesn’t produce any more logs because of (approved) traffic hitting it – meaning that there isn’t any traffic happening that hasn’t already hit a rule above – you can close the gate. Be very careful when doing this and keep monitoring.
Microsegmentation is an incredibly powerful tool, capable of providing orders of magnitude more security to your environment. But it does not suffer fools.
Good luck and have fun!
This concludes my Getting Started with NSX-T series! We looked at how to deploy NSX-T in a (lab) environment, explaining all the steps and components in between, until we finally have secured one of our applications. Hope reading this has been as educational for you as writing it has been for me.
Bonus: Microsegmentation in one minute (narrated by yours truly): https://www.youtube.com/watch?v=CZDhCqxQQ-Y
 LinkedIn
 Twitter
Questions, Remarks & Comments
If you have any questions and need more clarification, we are more than happy to dig deeper. Any comments are also appreciated. You can either post it online or send it directly to the author, it’s your choice.