


Leave us your email address and be the first to receive a notification when Matts posts a new blog.
The first thing that comes to mind is setting up everything at your home, investing in hardware like a server and some storage. This can be quite costly and it’s understandable that not everyone is able to make this investment. Fortunately, VMware supplies the free Hans-On-Labs.
Please note this blogpost is aimed at building your own environment at work or at home.
VMware Hands-On-Labs
Although actively promoted throughout the community, there are still a lot of people that don’t know about the Hands-On-Labs sponsored by VMware. These labs are online environments for only you to work in, they are accompanied by instructions and function as great tutorials. Even if you have your own lab, it’s still great to use every now and then. Best of all, it’s free to use after creating a, free, account! Visit the website: https://hol.vmware.com
Jump right into the catalog: https://labs.hol.vmware.com
Preparations
Goal
Before diving straight in to building a lab, it’s important to find out what you want to do. What is the purpose of the lab, what software will you be running? This can still be very basic but it’s important to find out what you need.
A few examples:
- I want to run 3 VM’s to test an application (Web, App, DB).
- I want to create a vSphere cluster with High Availability.
- I want to set up NSX-V for network virtualization.
Hardware requirements
Based on the goals above, you can find out what you need in terms of hardware. Remember that the first thing you are likely to run out of is memory, it’s always memory. To give an overview of most used resources ranked from most to least used:
- Memory
- Storage
- CPU
- Network
As you can see, don’t worry too much about CPU usage unless you know you will run some extremely CPU intensive applications. Of course, this is personal experience, it might be different for your specific use case.
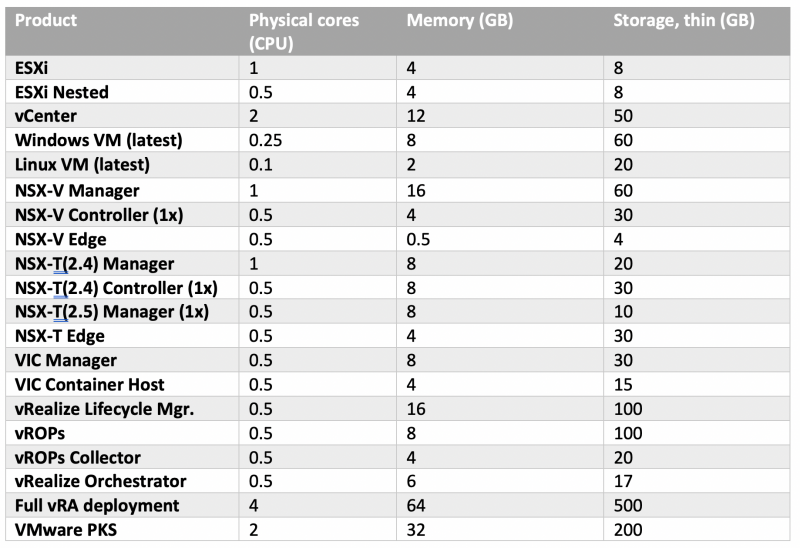
Overall estimates of required hardware to comfortably run an environment:

As you can see there is quite a steep incline in resources, specifically memory. In this example I calculated enough room for deploying some VM’s using thin provisioning for the VM disks, which means it’s only using disk space of what’s written to disk.
Calculate
Let’s go a bit deeper into the hardware requirements. The example above is good overall but might not really fit your needs. Here’s a table with some estimates for commonly used lab setups:
Example to use above list:
You want to run a 3-host compute cluster and 2-host management cluster VMware PKS in your lab, you have 1 physical host, that host would need 1x ESXi, 5x ESXi Nested, 1x vCenter, 3x NSX-T (2.5) Manager, an NSX-T Edge and then 1x VMware PKS. Of course, then you also need some hardware to run the workload.
Grand total of hardware needed on the physical server:
- CPU: 10 physical cores (12 cores to have some workload space)
- Memory: 120GB (Make it 128GB to have some workload space)
- Storage: 430GB storage (Make it 500 to have some workload space)
Design
Now that you know what you can do with your hardware and chose what you want to build, it’s time to set up a small design before you start installing. Doing this up front will make the process a lot less complicated and you will avoid running into errors or losing track of what is where.
To make it easy, name every object in the design ranging from VLAN’s used to host and cluster names.
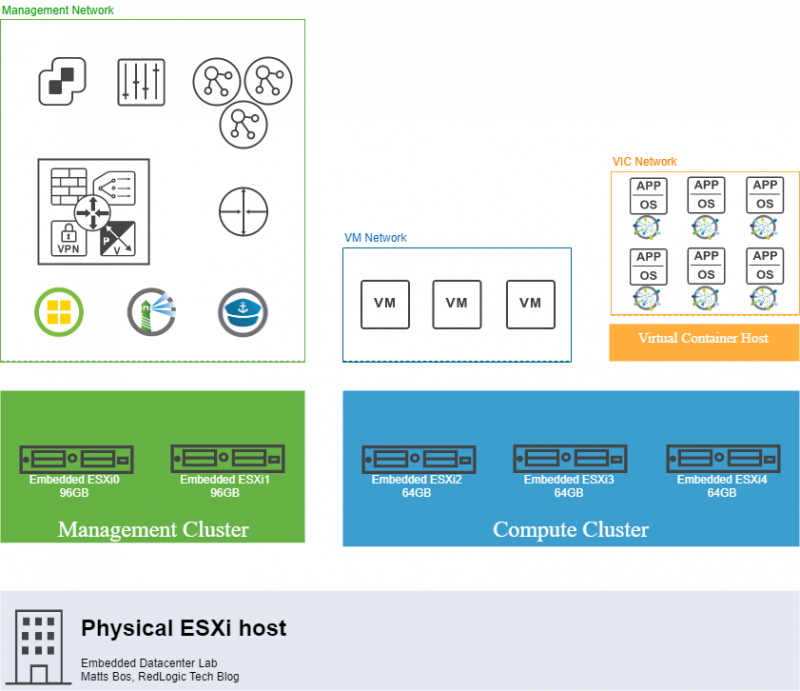
I’ve made an example design based on the example above except I used VIC instead of PKS since I need a VIC environment for some testing. I also supersized it quite a bit because it’s likely I will install VMware PKS later, planning!
Deploying the Lab
External Networking
Before you start the installation of ESXi, let’s get the network connected to the physical host up and running first. You can do this further down the road, but I prefer to do it up front as it avoids troubleshooting while testing the environment.
All I need in the design above are the following VLAN’s:
- Management
- vMotion
- VM Network
- VIC
You must configure this on your switch(es) and connect the VLAN’s to a L3 network device if you like (as you probably want network access from and to some of these VLAN’s). This can be any VLAN enabled router you have on your network.
Installing ESXi (physical)
Download the ESXi ISO from vmware.com or a custom ISO supplied by your hardware vendor and mount it on the physical ESXi machine. This can be done with USB or in some cases through the management port of the server.
For extensive information on installing ESXi please watch a video on YouTube or see one of many tutorials already written about this.
In my case I make sure the host has its own static IP address and is connected to the Management VLAN.
Configure ESXi (physical)
The next step is to configure the host that was just installed. Log on to the host by browsing to the webclient, it can be found by browsing to the hosts IP address. You can see this is now a working ESXi hypervisor. If you haven’t done so during the installation, you can configure hostname, DNS, NTP etc. through the webclient.
Networking
If you just want to run some VM’s, the standard vSwitch is fine and you can configure portgroups with VLAN’s and start running VM’s on it. There is nothing further you need for this purpose.
If you want to run nested ESXi cluster like in my example, now is the time to add a portgroup with VLAN trunking. This makes sure all traffic can travel through this trunk to the nested ESXi later.
For nested ESXi hosts to use an uplink from a physical ESXi host there are a few very important settings, without these the nested ESXi host will not communicate. You can find these in the advanced settings of your trunked portgroup.
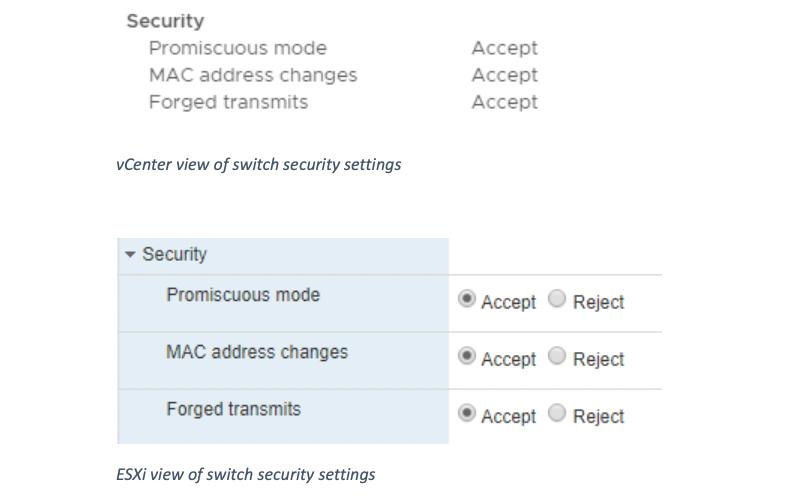
Some explanation:
Promiscuous mode, setting this to “Accept” will allow all traffic from the nested ESXi host. Having this “Reject” (default) will stop the flow and deny traffic. For any other VM, you usually want to keep this on “Reject”
MAC address changes, having this on “Accept” will allow the sending MAC address to be different to the one recorded in the VM’s .vmx file. Since the Nested ESXi host connects other MAC addresses we need to accept everything, not just the one VM MAC address that’s in the file. Normally you don’t need this, however, when you are playing with a test lab changing Nested configs, this will save you some trouble.
Forged Transmits, having this on “Accept” will allow outgoing frames to the Nested ESXi to pass even though the destination MAC address differs from the Nested ESXi’s MAC address.
Storage
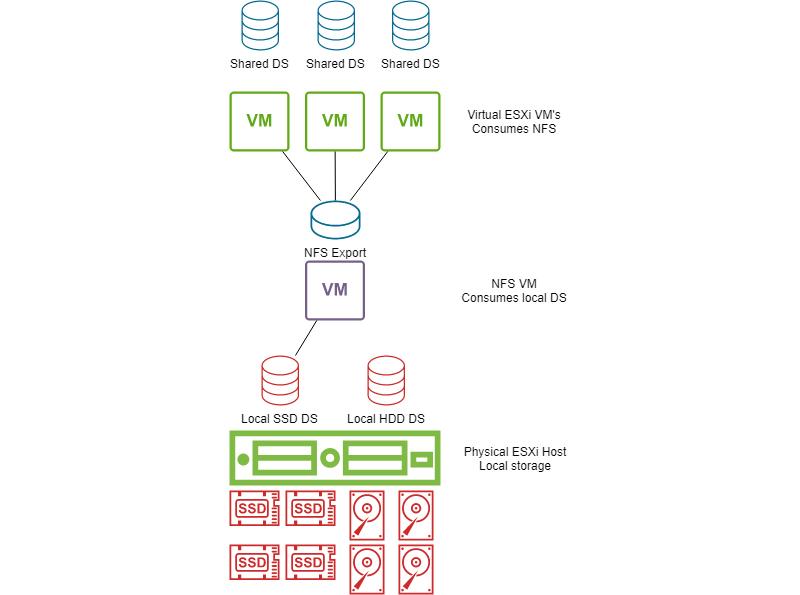
For storage there are multiple options. To keep it easy, to ESXi/vSphere there are two groups of storage, local and shared. Local works fine with a single server, but as soon as you start clustering you want shared storage. Shared storage is often quite expensive for a test lab to get, most home users will only have access to some non-performing consumer NAS solution. Although it can work if you don’t expect too much of it.
Local storage is what most home users have, disks present in the server/computer. Since, in the design we’re working with here, there is only one physical server running the nested environment we can turn the local storage on the physical server into shared storage by booting a VM on the physical host to serve, for example, NFS. This small trick will allow you to connect all Nested ESXi hosts to a fake shared storage solution. Just make sure the VM serving the shared storage always boots before any Nested ESXi that relies on it! (Tip: use the AutoStart order)
This concludes the physical ESXi host setup for a nested environment and part 1 of the Homelab 101 series.
 LinkedIn
 Twitter
Questions, Remarks & Comments
If you have any questions and need more clarification, we are more than happy to dig deeper. Any comments are also appreciated. You can either post it online or send it directly to the author, it’s your choice.