


Leave us your email address and be the first to receive a notification when Robin posts a new blog.
“The Get-NsxtPolicyService, Get-NsxtGlobalManagerService, and Get-VmcSddcNetworkService cmdlets have been deprecated. Use the cmdlets from the VMware.Sdk.Nsx.Policy module instead.”
Since I’ve been using the Get-NsxtPolicyService quite a lot in scripts to import and export NSX Distributed Firewall configuration, so I decided to have a closer look.
This blog shows you, how to create services in NSX using the new PowerCLI modules. VMware already written a general blog on this topic, but it doesn’t reveal how to create specific security groups or services.
Below you will find some examples for creating services in NSX. There is also a previous blog where you can find examples about creating NSX security groups based on IP-addresses of Active Directory groups.
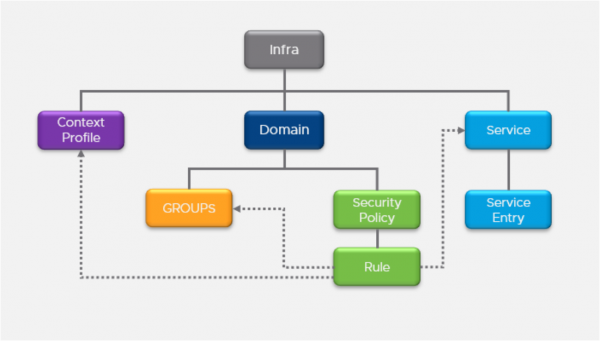
Before we dive in, let’s start with a little introduction. An NSX service consist of a service, with one or more service entries. Looking at the greater picture, the NSX service is located under ‘infra’ in the policy tree and not under a domain, like the security policies or groups. As you can see below in the Data Model of NSX Distributed firewall. The service is referenced in a firewall rule and contains one or more service entries.
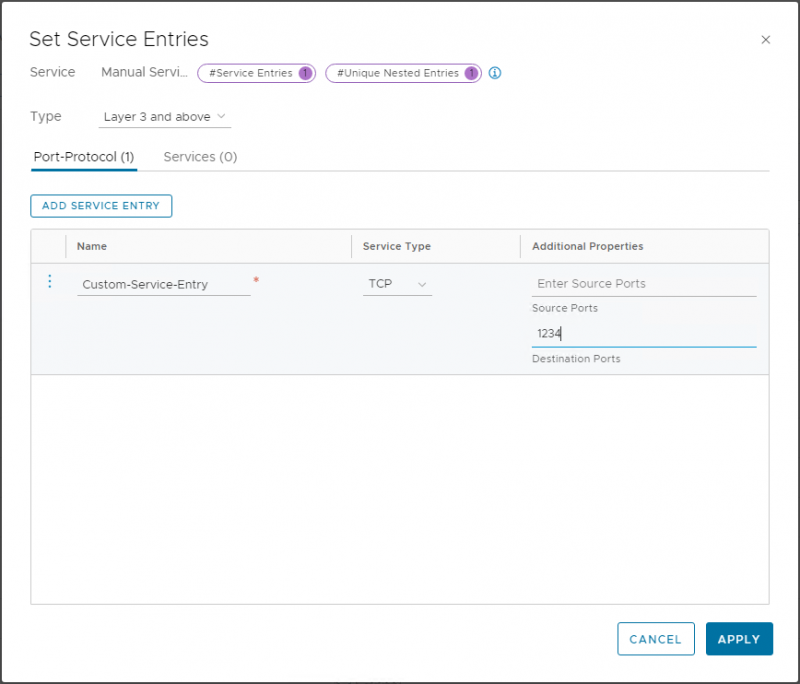
When creating a service manually, the service entry can either be a custom created service entry or an existing service.
Like creating security groups, we start with creating the services by specifying the service entries, putting the service entries in an array, and creating a service with this array.
After connecting to the NSX managers, using Connect-NsxServer cmdlet, you can search for the cmdlets that are required to create a service. When you want to patch (create or edit) a service. Using:
Get-Command –Module VMware.Sdk.Nsx.Policy -name Invoke-patch*service*
You get the following list of possible cmdlets:
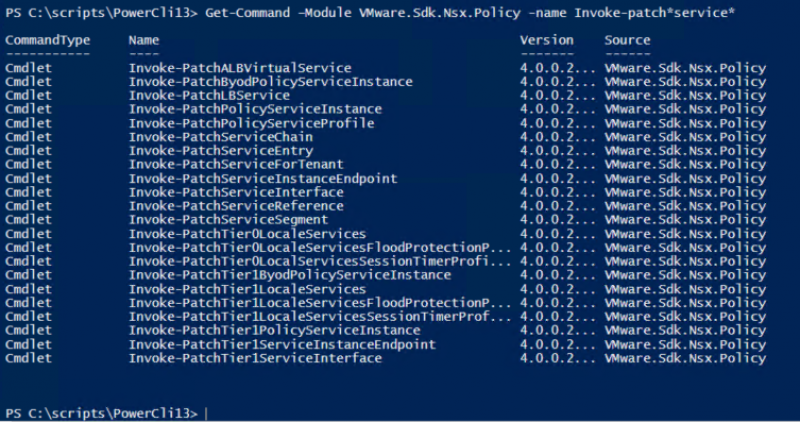
By looking at the list, my best guess was to use Invoke-PatchServiceForTenant to create the service. In a similar method you can look at the cmdlets to initialize the service entries.
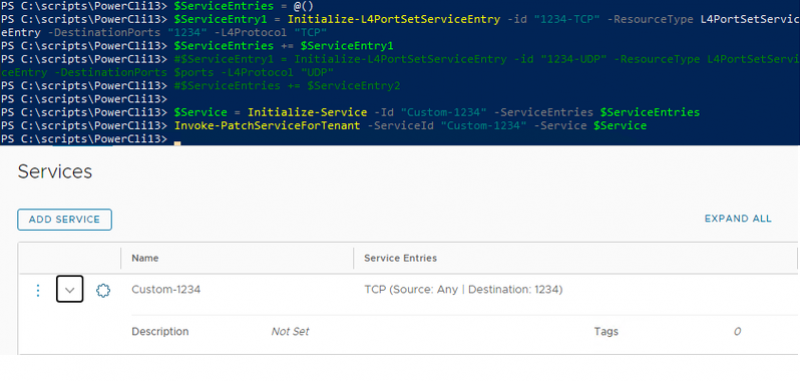
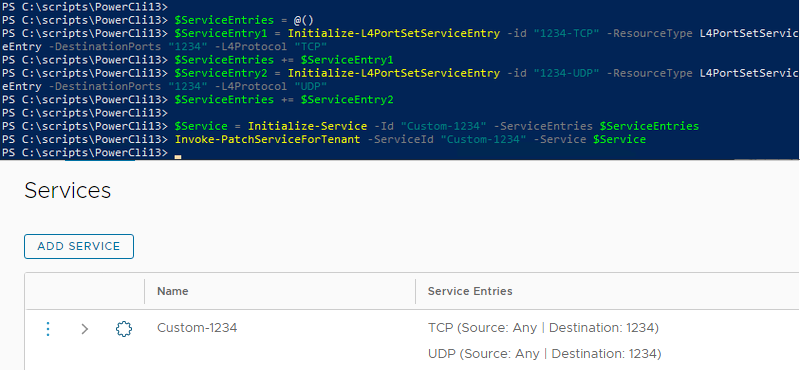
In the first example I want to create a simple service with a service entry for destination port 1234 TCP.
Creating TCP or UDP service entries can be done with the Initialize-L4PortSetServiceEntry
First create an array. Then add the service entries for 1234-TCP. The next step is to initialize the service with this array. And finally patch the service with it.
The complete code and result, looks like this:
$ServiceEntries = @()
$ServiceEntry1 = Initialize-L4PortSetServiceEntry -id "1234-TCP" -ResourceType L4PortSetServiceEntry -DestinationPorts "1234" -L4Protocol "TCP"
$ServiceEntries += $ServiceEntry1
$Service = Initialize-Service -Id "Custom-1234" -ServiceEntries $ServiceEntries
Invoke-PatchServiceForTenant -ServiceId "Custom-1234" -Service $Service
Creating a service with two service entries can be done by adding a second Initialize-L4PortSetServiceEntry command to the array of service entries, for example:
$ServiceEntries = @()
$ServiceEntry1 = Initialize-L4PortSetServiceEntry -id "1234-TCP" -ResourceType L4PortSetServiceEntry -DestinationPorts "1234" -L4Protocol "TCP"
$ServiceEntries += $ServiceEntry1
$ServiceEntry2 = Initialize-L4PortSetServiceEntry -id "1234-UDP" -ResourceType L4PortSetServiceEntry -DestinationPorts "1234" -L4Protocol "UDP"
$ServiceEntries += $ServiceEntry2
$Service = Initialize-Service -Id "Custom-1234" -ServiceEntries $ServiceEntries
Invoke-PatchServiceForTenant -ServiceId "Custom-1234" -Service $Service
Note: In this blog I first deleted the service before re-creating it. I’ve not updated the group, just to show you how a creation of different services works.
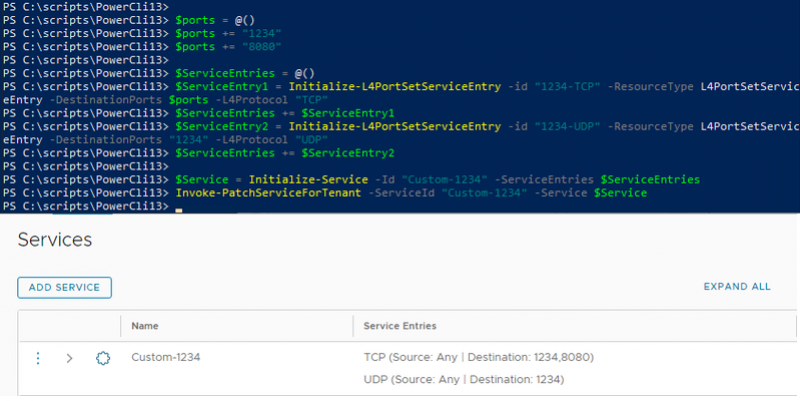
If you want to create a service entry with multiple ports, you first need to add those ports to an array. Like the example below:
$ports = @()
$ports += "1234"
$ports += "8080"
$ServiceEntries = @()
$ServiceEntry1 = Initialize-L4PortSetServiceEntry -id "1234-TCP" -ResourceType L4PortSetServiceEntry -DestinationPorts $ports -L4Protocol "TCP"
$ServiceEntries += $ServiceEntry1
$ServiceEntry2 = Initialize-L4PortSetServiceEntry -id "1234-UDP" -ResourceType L4PortSetServiceEntry -DestinationPorts "1234" -L4Protocol "UDP"
$ServiceEntries += $ServiceEntry2
$Service = Initialize-Service -Id "Custom-1234" -ServiceEntries $ServiceEntries
Invoke-PatchServiceForTenant -ServiceId "Custom-1234" -Service $Service
With these steps you can create almost every combination of services. The other service entry types can be found with Get-Command –Module VMware.Sdk.Nsx.Policy -name Initialize-*ServiceEntry
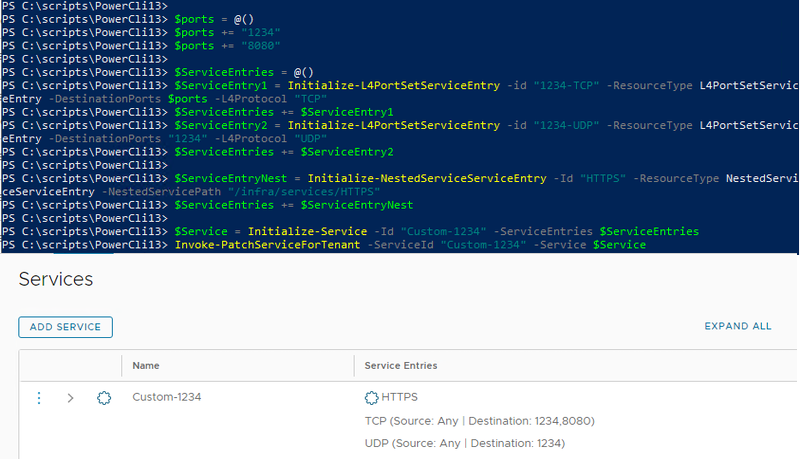
For the last example, I’ll add an existing service to the service I’m creating. The code is relatively similar, except the service is being added or nested within the Initialize-NestedServiceServiceEntry cmdlet. In the example below, I have written out the ID and Path for the service, but these can also be retrieved with the command Invoke-ReadServiceForTenant -ServiceID HTTPS. If the ID can’t be found, the space can usually be replaced by an underscore.
$ports = @()
$ports += "1234"
$ports += "8080"
$ServiceEntries = @()
$ServiceEntry1 = Initialize-L4PortSetServiceEntry -id "1234-TCP" -ResourceType L4PortSetServiceEntry -DestinationPorts $ports -L4Protocol "TCP"
$ServiceEntries += $ServiceEntry1
$ServiceEntry2 = Initialize-L4PortSetServiceEntry -id "1234-UDP" -ResourceType L4PortSetServiceEntry -DestinationPorts "1234" -L4Protocol "UDP"
$ServiceEntries += $ServiceEntry2
$ServiceEntryNest = Initialize-NestedServiceServiceEntry -Id "HTTPS" -ResourceType NestedServiceServiceEntry -NestedServicePath "/infra/services/HTTPS"
$ServiceEntries += $ServiceEntryNest
$Service = Initialize-Service -Id "Custom-1234" -ServiceEntries $ServiceEntries
Invoke-PatchServiceForTenant -ServiceId "Custom-1234" -Service $Service
Hopefully, you have enjoyed reading this blog and get started with creating NSX Services using the PowerCLI13 modules.
If you have any questions or would like to see some more? Please use the message option below.
 LinkedIn
 Twitter
Questions, Remarks & Comments
If you have any questions and need more clarification, we are more than happy to dig deeper. Any comments are also appreciated. You can either post it online or send it directly to the author, it’s your choice.