


Leave us your email address and be the first to receive a notification when Team posts a new blog.
Deploy and prepare a Tanzu Kubernetes Cluster
In part 1 of 'Building the Lab: vSphere with Tanzu and TKG' I talked about how to install an up-to-date lab environment. The lab has Workload Management enabled and is ready for vSphere Pods. With this setup it should be possible to run the Yelb-app without a problem. The problem isn’t in deploying the app. The problem with vSphere Pods is that they are not very popular in the developer world. The experience is Kubernetes-like and most developers want an OCI compliant Kubernetes environment. To address this, VMware made it possible to use the Tanzu Kubernetes Grid Service (TKGS). TKGS deploys an isolated OCI compliant Tanzu Kubernetes Cluster in a namespace. In part 1 we already created this namespace in the Workload Management cluster. And it would be nice if we could actually deploy a working application on this cluster. This blog will focus on deploying a Tanzu Kubernetes Cluster and prepare it to run workloads.
Short technical overview
As said, deploying a Tanzu Kubernetes Cluster needs to be done in a namespace that exists in the Workload Management cluster. This can be a new namespace, but also an existing namespace. It does not matter if the existing namespace already has pods present. The Tanzu Kubernetes Cluster to be created, is an isolated environment and does not communicate with existing vSphere Pods or other Tanzu Kubernetes Clusters.
The cluster needs to be created by applying a YAML file on the Supervisor cluster. Then it will create at least 3 VM's. One VM for the master node and two VM's as worker nodes. The developer can be granted full-control or root access to the Tanzu Kubernetes Cluster. This is done using vCenter SSO access. From the vSphere admin side the nodes of the cluster are visible, however, the pods deployed by the developer are not. This in contrast with the vSphere Pods who act as actual virtual machines in vCenter.
This is how it looks like in vCenter:
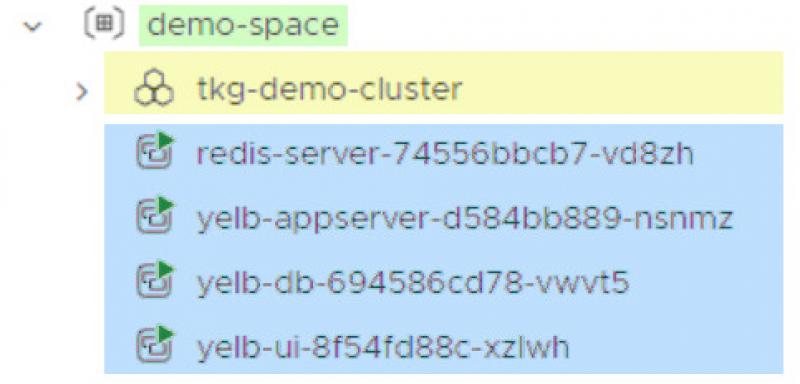
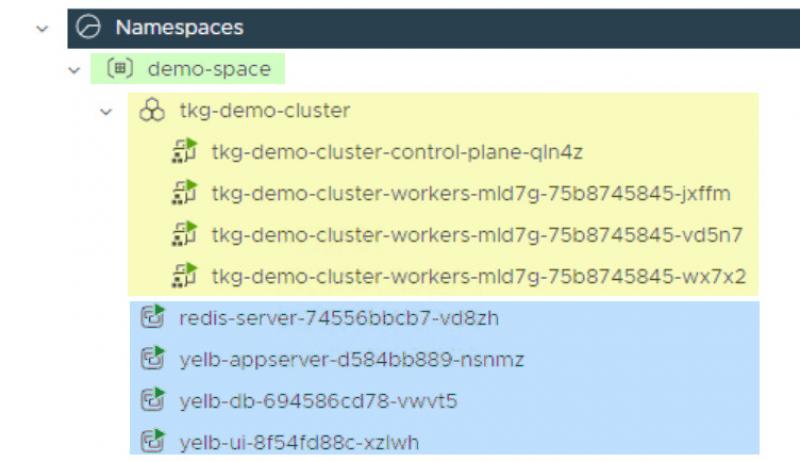
- Green: highlights the namespace, in this case my demo-space.
- Yellow: highlights the Tanzu Kubernetes Cluster shown in vCenter. You will see a familiar cluster sign to indicate it is a cluster. When you expand the cluster, it shows the nodes in the cluster. Remember, these are nodes, not pods. Pods are running on the nodes and are not visible in vCenter.
- Blue: highlights vSphere pods. These are actual pods, running directly on the VMKernel and behaving like VM's. This will not be the focus of this blog, but I am just showing you the differences.
Choices made
There are multiple roads that lead to Rome. So, to write this blog and keep it as consistent as possible I had to make a few choices. Feel free to take other paths or side-tracks whenever you feel like it. My main goal in this blog is to show you the path I took, what I experienced and how I got it working. Here are some choices I made:
- focus on preparing a functional Tanzu Kubernetes Cluster
- use VMware documentation as the base for the Tanzu Kubernetes Cluster deployment
- use the Kubernetes v1alpha1 API
- fulfill requirements on the go
- workload deployment will be the subject of another blog
Prepare vCenter to deploy Tanzu Kubernetes Cluster
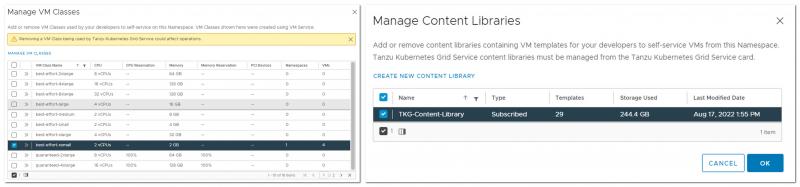
Before deploying a Tanzu Kubernetes Cluster it is important to assign services to the namespace. This is important because this determines the Content Library to use and the VM classes available. If you do not do this, your deployment will most likely fail.
For this blog I have selected one VM class and the Content Library that is already present. As described in part 1 of this series.
The services are assigned from the vCenter User Interface. Select the namespace that is going to hold the Tanzu Kubernetes Cluster and be sure you are on the summary tab. Look for the box with VM Service.

Click on Manage VM Classes. This will open a screen with all classes available. In this example I chose for: "best-effort-xsmall". It is possible to select something different or to select them all. Just be sure to adjust the YAML file for installing the cluster with the correct VM Class. Once done, click on Manage Content Libraries and select the Content Library.
Deploy Tanzu Kubernetes Cluster
The next step is to deploy the cluster. A Tanzu Kubernetes Cluster is deployed from the Supervisor cluster with a YAML file. This will create an isolated Tanzu Kubernetes Cluster environment for you. A separate login is needed to access the Tanzu Kubernetes Cluster. The login can be done with vCenter SSO. As I will show you later.
First of all, connect to the Supervisor Cluster and select your namespace.
PS C:\mydir> kubectl vsphere login --server=192.168.160.130 -u administrator@vsphere.local --insecure-skip-tls-verify
PS C:\mydir> kubectl config use-context demo-space (or your own namespace)
Now copy-paste the code for deploying the Tanzu Kubernetes Cluster and save it. In the code make sure to change the namespace to the name you are using. Also, choose a cluster name as you wish. In case you chose another VM Class earlier, make sure it matches the "class" field in the code. It is as easy as that. Apply the code and wait.
apiVersion: run.tanzu.vmware.com/v1alpha1
kind: TanzuKubernetesCluster
metadata:
name: tkg-demo-cluster
namespace: demo-space
spec:
distribution:
version: v1.22.9
topology:
controlPlane:
class: best-effort-xsmall
count: 1
storageClass: tanzu-gold-storage-policy
workers:
class: best-effort-xsmall
count: 3
storageClass: tanzu-gold-storage-policy
settings:
network:
cni:
name: antrea
services:
cidrBlocks: ["198.51.100.0/12"]
pods:
cidrBlocks: ["192.0.2.0/16"]
storage:
defaultClass: tanzu-gold-storage-policy
PS C:\mydir> kubectl apply -f .\tkg-cluster.yaml
PS C:\mydir> kubectl get tanzukubernetesclusters
![]()
Connect to the cluster
With the cluster ready it is time to connect to the new Tanzu Kubernetes Cluster. Once connected change to the context to tkg-demo-cluster.
kubectl vsphere login --server=192.168.160.130 -u administrator@vsphere.local --insecure-skip-tls-verify --tanzu-kubernetes-cluster-name tkg-demo-cluster --tanzu-kubernetes-cluster-namespace demo-space
Logged in successfully.
You have access to the following contexts:
192.168.160.130
192.168.160.20
demo-space
tkg-demo-cluster
If the context you wish to use is not in this list, you may need to try logging in again later, or contact your cluster administrator.
To change context, use `kubectl config use-context <workload name>`
Apply security
At this point your Tanzu Kubernetes Cluster is installed and ready. Or should I say almost ready. It is important to remember that the Tanzu Kubernetes Cluster is an isolated environment. This means by default you will not have sufficient permissions to deploy a workload. To solve this, it is necessary to apply a Pod Security Policy (PSP) through RoleBinding and/or ClusterRoleBinding. For the demo in this blog, I will go the easy way. Which means creating a ClusterRoleBinding that grants access to authenticated users to run workloads by using the available Pod Security Policy vmware-system-priviliged. This is a cluster-wide setting and should not be used for tight security. However, for this demo it will do the job perfectly.
There are two ways to achieve this and either way is fine:
- apply a YAML file
- run a kubectl command
This time I made the choice to just run the kubectl command.
PS C:\mydir> kubectl create clusterrolebinding default-tkg-admin-privileged-binding --clusterrole=psp:vmware-system-privileged --group=system:authenticated
At this point you will have an actual Tanzu Kubernetes Cluster up and running, waiting to run some applications!
Conclusion
I hope that by writing my experiences down and following my line of thoughts, I am somewhat able to make you part of my journey into Kubernetes and Tanzu. It is not always easy and sometimes even frustrating when things do not work as you hope. Or when documentation is not updated fast enough to keep track with software changes. On the other hand, diving into this is super fun with a lot of stuff to learn. So, please reach out if you have questions regarding the demo lab or just in general.
Next steps
With the Tanzu Kubernetes Cluster up and running I can imagine you also want to see it work! This I will cover in my next blog. When deploying workloads, I found out that some workloads are easy and some are not. In my next step I will show you how I got some workloads up and running. And some of my lessons learned.
Thanks for reading and please reach out if you have any questions or comments.
 LinkedIn
 Twitter
Questions, Remarks & Comments
If you have any questions and need more clarification, we are more than happy to dig deeper. Any comments are also appreciated. You can either post it online or send it directly to the author, it’s your choice.